Yepoleb
Transparent proxying setup for mitmproxy with only one VM
You can find the new content at https://yepoleb.at/blog
The official guide on proxying VMs with mitmproxy is quite simple and works reliably, but it has one big flaw: if you’re already a Linux host that can do transparent proxying, the second VM adds nothing of value and the process of moving data in and out of the VM is annoying. In this guide we’ll instead use the host to do do all those tasks for us.
VM Configuration
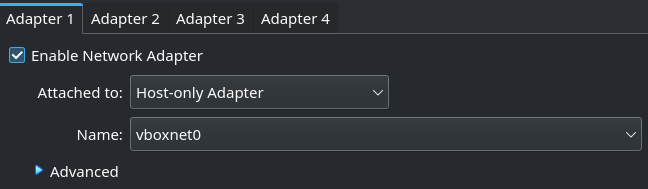
We’re going to configure two network interfaces on our VM. The first one is going to be a so called “Host-only Adapter”. Despite of what the manual might tell you, host-only networking does not make it impossible for the guest to communicate with the outside world, it’s just up to the user to configure packet routing beyond a simple tunnel connection. This is the adapter type you want to use whenever you need to apply any packet filtering or manipulation rules to the network traffic of a VM.
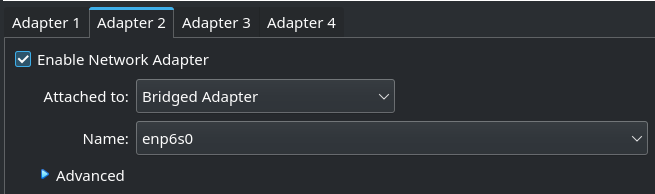
The second adapter is going to be a simple NAT or bridged connection as a backup. VirtualBox allows you to toggle whether a device is usable with the “Cable Connected” property, even while the machine is running, so adding a second interface does not prevent us from routing everything through the first one. I found such a backup device very useful because it makes it possible to restore internet access in seconds when you want to take a break from reverse engineering stuff or quickly need to use a tool that would need modification to work in such a setup. It’s technically not necessary, but because the point of this post is all about convenience, I thought it’s a great addition.
For the host-only adapter to work we first need a corresponding virtual device on the host. The “Host Network Manager” is accessed through the “File” menu. I went for a simple 192.168.3.1/24 address configuration with DHCP disabled. Maybe it works fine with DHCP enabled, I just wanted to eliminate another source of error. The host adapter will be called vboxnet0 in this example.

Setting up the guest device is as simple as choosing the host device in a drop down list.
I went ahead and enabled the afore mentioned second adapter in bridged mode. If you prefer NAT, it should work just as well.
Now we can boot up the VM and in the Devices->Network menu disconnect the backup adapter.
Network Configuration
For our host to be able to forward traffic, IP forwarding first needs to be enabled.
sudo sysctl -w net.ipv4.ip_forward=1
With ip addr check if vboxnet0 has an IP configured and is enabled. If it is not, you can use these commands to fix the configuration:
sudo ip addr add dev vboxnet0 192.168.3.1/24
sudo ip link set vboxnet0 up
The guest system also needs to be assigned an address. I am using a Windows 10 guest here. 192.168.3.10 is the client address and 192.168.3.1 the gateway. The gateway in this case is the host address. The DNS server is copied from my local network, this value does not have any special function in this case, it just has to point to a working DNS server.
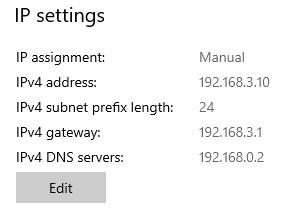
It’s time a for a quick ping test. 192.168.3.1 and 192.168.3.10 should be able to reach each other if everything up to here is set up correctly.
iptables Configuration
This step is where the real magic happens. Make sure iptables does not block anything using the command below.
iptables -L
All three chains should have a default policy of ACCEPT. If you have more complicated firewall rules already set up, allow INPUT on port 8080 and FORWARD from and to the 192.168.3.0/24 address range.
Now while packets are able to be forwarded from guest to wan, there is no way for the response to get back to the guest because nobody knows how to reach the 192.168.3.0/24 network. The original tutorial works around this by proxying HTTP, HTTPS and DNS traffic, so most things work fine, but there are still quite a few other protocols that might be required by certain applications that are simply dropped. Because I do not want to set up a DNS cache, we’re doing this the proper way.
We’re using a technique called source NAT, which is implemented in the way we want it under the name MASQUERADE in iptables. It replaces the 192.168.3.10 address with the address the host uses to communicate with the LAN gateway, which it obviously knows how to reach, and lets the host keep track of where traffic needs to go. The following command tells iptables to apply masquerade to all traffic going out the physical interface (in my specific case enp6s0) coming from the whole 192.168.3.0/24 subnet.
sudo iptables -t nat -A POSTROUTING -o enp6s0 -s 192.168.3.0/24 -j MASQUERADE
Another ping test should confirm that the VM is now able to reach the entire internet without any more restrictions. If everything works up to this point it is time to apply the redirection to mitmproxy:
sudo iptables -t nat -A PREROUTING -i vboxnet0 -p tcp --dport 80 -j REDIRECT --to-port 8080
sudo iptables -t nat -A PREROUTING -i vboxnet0 -p tcp --dport 443 -j REDIRECT --to-port 8080
mitmproxy --mode transparent --showhost
That’s it, install your certificate as usual and traffic should flow through mitmproxy without any issue.